Thoughts

Using Stimuli During Research
Design research, typically a way to extract information, can also be a way to support creativity with our customers and users. As the foundation for design strategy, the basics of design research are fairly simple: go to the people, instead of bringing them to you, and follow a loose script rather than a formal interview protocol. Within that, there are nuances and craft along with a variety of types (and sub-types) of research for various contexts.
- Foundational research is focused on building empathy and understanding through more traditional interactions, like discussion.
- Evaluative research is aimed at understanding the value of something that’s been made, or a concept that’s been proposed.
- Generative research is about actually creating new things, knowledge, or ideas during the research session.
We’re not advocates of one specific type of research, our sessions are often a blend of these three approaches, but one thing that is common across all of our research is our inclusion of stimuli—prompts that are used to focus and guide the process.
Understanding Stimuli
Research stimuli are any tangible artifacts that are used during a session to prompt introspection, activity, or discussion. These types of artifacts help participants communicate their thinking and feelings in non-verbal ways. Spoken language is one of the most effective communication tools we have, but many people have a difficult time being put on the spot to talk through complex ideas in a way that represents their real intent—finding language with enough nuance and detail to describe their thinking can be difficult.
Designers feel comfortable saying things that are “half baked” and working through the ambiguity out loud, using sketching and drawing to further explore those ideas as they form. But most people are unfamiliar with adding another layer of communication, and shy away from things that may highlight their inexperience (“I can’t draw”). We use research stimuli to give our participants support as they explore their thoughts and ideas.
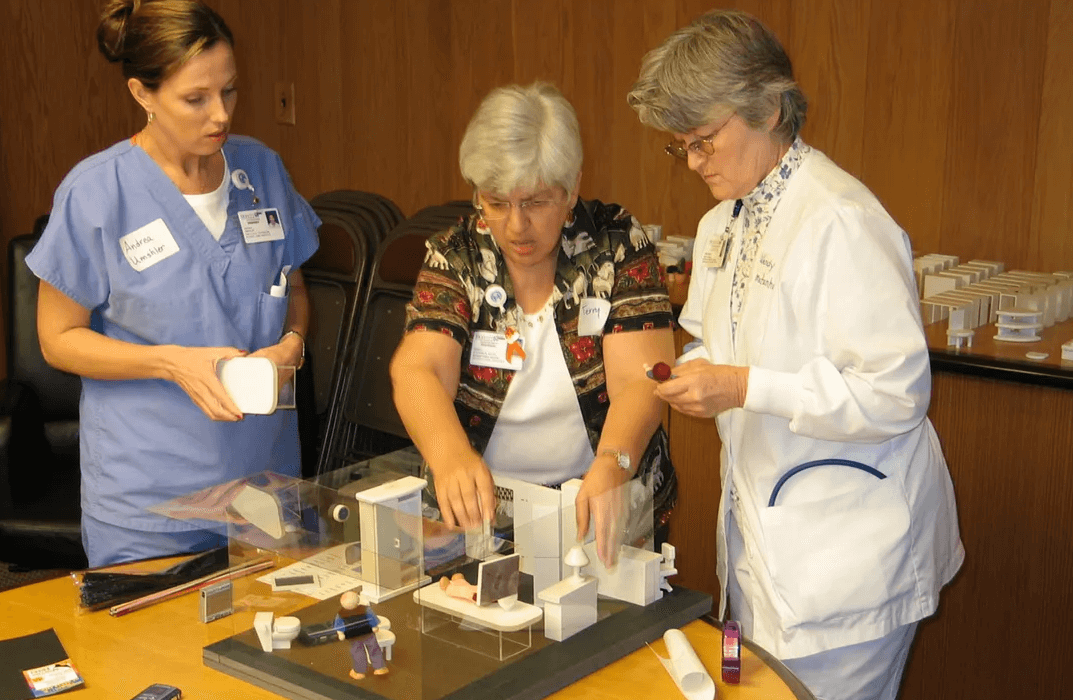
In some contexts, stimuli take the form of physical items. For example, researcher Liz Sanders has worked extensively with hospitals, and uses stimuli that represent (and look like) hospital beds, cabinets, and so-on.

In “Generative Tools for CoDesigning” from Collaborative Design, she explains that these stimuli toolkits for her ethnographic research, “take advantage of the visual ways we have of sensing, knowing, remembering and expressing. The tools give access and expression to the emotional side of experience and acknowledge the subjective perspective. They reveal the unique personal histories people have that contribute to the content and quality of their experiences.”
For Sanders, these toolkits recast our participants from “users” or “customers” to “designers” or “creators.” It’s a democratization of the process as much as it is a novel way to conduct research.
Our stimuli are typically much more abstract than the hospital example. Some of the most basic tools we use to guide participant exploration are:
Timeline
At Narrative, the most common stimuli we use is a timeline. We bring a sheet of paper that has a horizontal access indicated as time, a smiley face at the top, and a frowny face at the bottom.
Then, we craft an exercise that extracts key moments in a journey, and have our participants literally draw them on the map. Good experiences are indicated on the top, and bad experiences are indicated on the bottom. The content of the timeline itself varies depending on the client and topic.
For example, we recently completed a project focused on helping college students transfer from school to school and graduate on time. We used a timeline to help them reflect on their academic journey and communicate the highs and lows. Students thought about the journey, identified key moments, wrote them down, and then we discussed them.
This is what a completed form looks like:

Our script looked like this:
We would like to explore the educational experiences you’ve had so far. We’ll do an exercise that identifies some of the key memories you have about when you transferred schools, and then we’ll discuss those things. In front of you is a blank timeline. It represents your entire educational path related to when you transferred schools. On the left are early memories, and on the right is today. I’m going to ask you to silently write down the five or six most memorable experience you’ve had, and then we’ll discuss them.
You’ll see on the top a smiley face, and on the bottom is a frowny face. Write good experiences on the top, and bad ones on the bottom.
Do you have any questions before we get started?
After the Timeline has been completed…
Tell me more about what happened here (event by event). Why was this good (or bad)? What happened right after this event? Who else was involved in this event? When you think about this journey as a whole, how does it make you feel? If you were going to redo one of these events, what would you change? Why? What will you do next?
Typical questions, and our answers, include:
Q: You actually want me to write these down?
A: “Yes, please use this pen and write down a single sentence about each item.”
Q: When does this start, what goes on the left?
A: “The left of the timeline represents the beginning of your transfer experience. It can be any time or event that you think is where the process started for you.”
Q: What counts as a memory I should write down?
A: “Think about what events were most pivotal, interesting, or important in your journey, and try to capture about five or six of those moments.”
We occasionally encounter difficulty as we work through this exercise. Most frequently, we can’t read the participant’s handwriting. If their work is illegible, when we discuss the timeline, we’ll re-write their answers.
Sometimes, when the participant starts, it becomes evident that they are giving a day-by-day reenactment of their experience, rather than identifying major points of interest. When this happens, we will interrupt and ask them to think less about each and every step, and instead, focus on the main points.
Several times, we’ve seen our participants write all of the items on the horizontal axis, rather than on top (good) and bottom (bad). When this happens, we’ll wait until they finish, and as we discuss the items, ask them if they were good and bad—and have them draw arrows to indicate the positive or negative experience.
The timeline serves a variety of purposes. First, it prompts introspection, giving the participant an opportunity to reflect—often for the first time—on the events that led up to where they are now. Next, it gives us an artifact that acts as a point of reference for discussion, grounding the conversation so that it can be specific, rather than general.
Most importantly, it grants the participant permission to think quietly.
In an interview, there is pressure to respond to questions quickly. Creating a timeline gives participants the chance to stop and really consider their answers.
Mad Libs
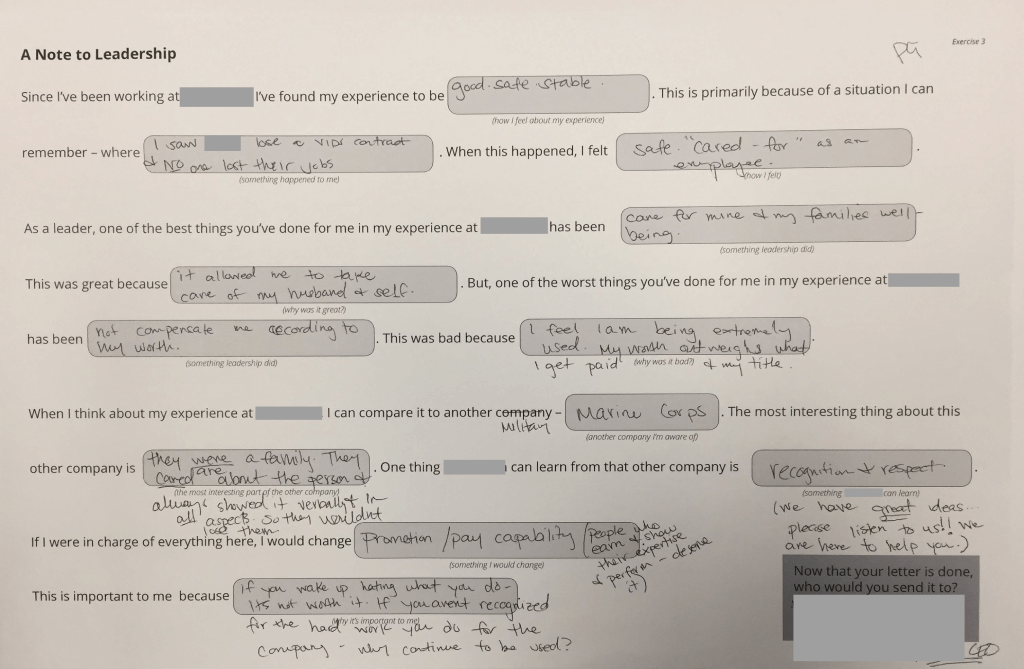
Another common tool we use is a “Mad Libs” exercise based on a simple game that many of us remember fondly from my childhood. A story is provided with missing phrases, players fill in the gaps, and hilarity ensues. During research, we adapt the game style, asking participants fill out an incomplete story like this one:
For example, on a recent project, we helped one of our partners learn more about the culture of their organization in order to improve the employee experience. We used a Mad Lib that asked the participant to write a letter to their leadership and then we had a discussion about what they wrote.

Our script looked like this:
This incomplete letter represents a note that we’ll pretend to send to your manager. I would like you to take a few minutes to fill it out silently, and then let’s talk about what you wrote. We’re not going to actually send the letter, but pretend we will.
Do you have any questions before we start?
After the Mad Lib has been completed…
Tell me more about what you wrote here (answer by answer). If you actually sent this letter… Who would you send it to? Why would you send it to them? What do you think would happen as a result? What might change in your company or department? When you think about the last answer–something to change–what do you think would be the hardest part of making this change? Why?
This exercise is so straight-forward that participants rarely have questions about the process. We do run into some issues that are similar to those with the timeline. Sometimes, we can’t read the participant’s handwriting. If their work is illegible, when we discuss the Mad Lib, we’ll rewrite their answers. Often, the participant uses only a few words to describe their answers. The discussion serves as a way to extract more information about the answers.
The Mad Lib serves several purposes. First, it provides a venue for sharing a private or personal moment (such as a note to leadership), without first having to discuss it aloud. Writing it down is personal, and the facilitator essentially blends away so that the participant is alone with their thoughts and the document.
As with the Timeline, it gives us an artifact that acts as a baseline for discussion. And, it makes a serious topic lighter.
Many of our participants know what a Mad Lib is, and even though this is not exactly the same, the name itself helps contextualize the activity as a game.
Interface Pieces and Parts
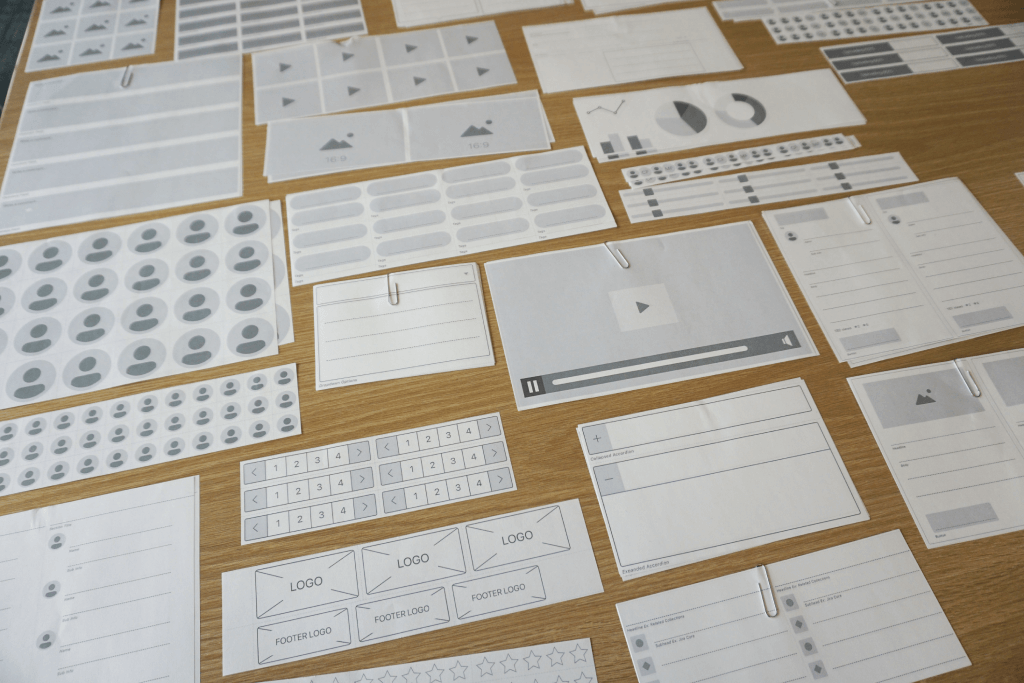
A tool we often use when focused on digital products is a set of interface pieces and parts. We provide the participant with UI components, printed on small pieces of paper, along with a series of design tasks. We then ask the participant to create their own designs to solve those tasks.

For example, on a recent project, we helped a software partner envision a potential new product design for communities to use. Midway through our own design, we brought their customers into a workshop environment, and had them produce their own solutions to the design problem.
Our script looked like this:
Today, you are all software designers, but you won’t need to write any code. We’re going to provide you with a variety of parts of software on pieces of paper and ask you to design some screens. You can move those pieces of paper around and create anything you want. Then, we’ll share your screens with the group and ask you to explain what you made.
There’s no wrong answer here, and don’t worry about making it look great—we’ll do that part later. Instead, try to make something that really reflects how you would expect the software to work.
After each activity has been completed…
Let’s look at what you created. First, tell us about it. When would the user encounter this screen? Why did you decide to design this (specific area) in this way? Tell me what you think would happen after the user clicked on [interacted with/filled out/completed] this piece? What is the most important part of the design you created?If this design existed, how would your job change?
The main question we hear when we run an activity like this is, “What do I do?” Even after listening to the directions, this activity is so foreign to participants that they sometimes need more instruction. In these cases, we do a sample. We quickly create an interface for something generic, like an alarm clock, and talk them through what we’re doing.
Once participants begin working through this activity, they run away with it. It’s fun, engaging, and fairly easy. The only real issue we run into is entirely logistical—some interface elements are small and blow around the room. We’ve tried printing the interface elements on thick card stock, but that makes them more “precious,” and our intent is for participants to treat them as a more transient or flexible tool. We simply put up with this challenge.
The interface pieces and parts activity serves a variety of purposes. It positions the participants as creative collaborators and empowers them to see value in their contributions. This introduces their expertise into the process—they may not be experts in interface design, but they are experts in understanding (even if only tacitly) their own needs.
And, it’s fun. We’ve found that when our participants are engaged, we gain richer data, and they have longer attention spans when working with stimuli like this.
In Summary
These are just some of the tools we use during contextual research, and they are fairly generic (and reusable). We often create custom tools that blend these types of stimuli together, in order to support the specific needs of a client project.
We find stimuli an effective way to expand the scope of our research and to simultaneously add depth to the information our participants provide us. We use them consistently as part of our design strategy process, in order to bring non-designers into the creative process, advocate on their behalf, and craft strategy that better supports their wants and needs.

